PROV-Template: A Quick Start

The aim of this blog post is to provide simple guidelines to generate provenance using the PROV-Template approach.

A quick reminder:  a provenance template is a PROV document, describing the provenance that it is intended to be generated. A provenance template includes  some variables that are placeholders for values. So,  a provenance  template can be seen as a declarative specification of the provenance intended to be generated by an application.   A set of bindings contains associations between variables and values. The PROV-template  expansion algorithm, when provided with a template and a set of bindings, generates a provenance document, in which variables have been replaced by values.

Therefore, three steps are involved in this methodology.

  1. Design a “provenance template” describing the structure of the provenance intended to be generated.
  2. Instrument the application, log values, and create “binding files” from these values.
  3. Produce provenance by expanding the template using binding files.

We consider a simple computation, which we would like to describe with provenance.   The computation consisted of 3 calls of binary functions: the functions were composed in such a way that the results of two calls were used by the third one. To simplify, we assume that the operations were arithmetic +, -, and *, and the values flowing and out of these operations were integers. Note my use of past tense: the aim of provenance is to describe past computation, as opposed to a future, hypothetical computation (or workflow).

(10+11)-(7*5)

As we have 3 binary functions, we design a template describing the invocation of a binary function.  It consists of an activity (denoted by variable operation), two used entities (denoted by variables consumed1 and consumed2), a generated entity (denoted by variable produced), and an agent (denoted by variable agent) responsible for the activity.  Graphically, the template can be represented as follows.

Template for the invocation of a binary function

Using the PROV-N notation, the template is expressed as follows.  We see that variables are declared in the namespace with prefix var. Each entity and activity is associated with a type, expressed by a variable, which can also be instantiated.

document
 prefix tmpl <http://openprovenance.org/tmpl#>
 prefix var <http://openprovenance.org/var#>
 prefix vargen <http://openprovenance.org/vargen#>

 bundle vargen:b
  activity(var:operation, [ prov:type='var:operation_type' ] )
  agent(var:agent)
  wasAssociatedWith(var:operation,var:agent,-)
  entity(var:consumed1,[prov:value='var:consumed_value1'])
  entity(var:consumed2,[prov:value='var:consumed_value2'])
  used(var:operation, var:consumed1, - )
  used(var:operation, var:consumed2, - )  
  entity(var:produced,[prov:type='var:produced_type',prov:value='var:produced_value'])
  wasGeneratedBy(var:produced, var:operation, - )
  wasDerivedFrom(var:produced, var:consumed1)
  wasDerivedFrom(var:produced, var:consumed2)
 endBundle
endDocument

To be able to generate provenance, one needs to define so-called “bindings files”, associating variables with values. The structure of bindings file is fairly straightforward: with the most recent version of the ProvToolbox, a bindings file can be expressed as a simple JSON structure. Such JSON structures are very easy to generate programmatically from multiple programming languages. However, in this blog post, we do not want to actually program anything in order to generate provenance.

Therefore, we are going to assume that the application already logs values of interest. We are further going to assume that the data can be easily converted to a tabular format, and specifically, that a CSV (comma separated values) representation can be constructed from those logs. The structure that we expect is illustrated in the following figure. In the first line of the file, we find variable names (exactly those found in the template) acting as column headers. In the second line, we find the type of the values found in the table.

Application log as a CSV file. First line contains variable names whereas second line contains the type of their values. Subsequent lines are the actual values.

Concretely, the CSV file uses commas as separator. The third, fourth, and five lines contain deftail of the invocations of the plus, times, and subtraction functions.

operation, operation_type, consumed1, consumed_value1, consumed2, consumed_value2, produced, produced_value, agent
prov:QUALIFIED_NAME, prov:QUALIFIED_NAME, prov:QUALIFIED_NAME, xsd:int, prov:QUALIFIED_NAME, xsd:int, prov:QUALIFIED_NAME, xsd:int, prov:QUALIFIED_NAME
ex:op1, ex:plus, ex:e1, 10, ex:e2, 11, ex:e3, 21, ex:Luc
ex:op2, ex:times, ex:e4,  5, ex:e5,  7, ex:e6, 35, ex:Luc
ex:op3, ex:subtraction, ex:e3, 21, ex:e6, 35, ex:e7, -14, ex:Luc

Each line can automatically be converted to a JSON file. For instance, the third line containing the details of the addition operation can be converted to the following JSON structure, which is essentially a dictionary associating each variable with its corresponding value, with an explicit representation of the typing information where appropriate.

{
 "var":
   {"operation": [{"@id": "ex:op1"}],
    "operation_type": [{"@id": "ex:plus"}],
    "consumed1": [{"@id": "ex:e1"}],
    "consumed_value1": [ {"@value": "10", "@type": "xsd:int"}],
    "consumed2": [{"@id": "ex:e2"}],
    "consumed_value2": [{"@value": "11", "@type": "xsd:int"}],
    "produced": [{"@id": "ex:e3"}],
    "produced_value": [ {"@value": "21", "@type": "xsd:int"} ],
    "agent": [{"@id": "ex:Luc"}]},
 "context": {"ex": "http://example.org/"}
}

We do not need to create this JSON structure ourselves. Instead, we provide an awk script that converts a given line into a bindings file.


function ltrim(s) { sub(/^[ \t\r\n]+/, "", s); return s }
function rtrim(s) { sub(/[ \t\r\n]+$/, "", s); return s }
function trim(s)  { return rtrim(ltrim(s)); }

BEGIN {
      printf("{\"var\":\n{")
      OFS=FS=","
}
NR==1 {                                # Process header
    for (i=1;i<=NF;i++)                
        head[i] = trim($i)                  
    next                               
}
NR==2 {                                # Process types
    for (i=1;i<=NF;i++)                
        type[i] = trim($i)             
    next                               
}
NR==line{
    first=1
    for (i=1;i<=NF;i++) {              # For each field
	if (first) {
	    first=0
	} else {
	    printf ","
	}
	if (type[i]=="prov:QUALIFIED_NAME") {
	    printf "\"%s\": [{\"@id\": \"%s\"}]",  trim(head[i]), trim($i)
	} else if (type[i]=="xsd:string") {
	    printf "\"%s\": [ \"%s\" ]",  trim(head[i]), trim($i)
	} else  {
	    printf "\"%s\": [ {\"@value\": \"%s\", \"@type\": \"%s\"} ]",trim(head[i]), trim($i), trim(type[i])
	}
    }
    printf "\n"                        
}
END {
    printf("},\n")
    printf("\"context\": {\"ex\": \"http://example.org/\"}\n")
    printf("}\n")    
}

To facilitate the processing, we even provide a Makefile with a target do.csv that processes a line (variable LINE) of the csv file to generate a bindings file. It is then used by the utility provconvert to expand the template file. The target workflow hard-codes the presence of three lines in the CSV, the generation of a bindings file for each line, and the expansion of the template with these bindings. All files are then merged in a single provenance file using the -merge option of provconvert.

LINE=4

do.csv:
	cat bindings.csv | awk -v line=$(LINE) -f src/main/resources/awk/tobindings.awk  > target/bindings$(LINE).json
	provconvert -bindver 3 -infile template_block.provn -bindings target/bindings$(LINE).json -outfile target/block$(LINE).provn


workflow:
	$(MAKE) LINE=3 do.csv
	$(MAKE) LINE=4 do.csv
	$(MAKE) LINE=5 do.csv
	printf "file, target/block3.provn, provn\nfile, target/block4.provn, provn\nfile, target/block5.provn, provn\n" | provconvert -merge - -flatten -outfile target/wfl.svg

The resulting provenance is displayed in the following figure.

Expanded provenance showing three activities, consumed and generated entities, and an agent.


Concluding  Remarks

Given a log file in CSV format, we have shown it is becoming easy to generate PROV-compliant provenance without having to write a single line of code: an awk script converts CSV data to JSON, used to expand a template expressed in a PROV-compliant format.

For the provenance to be meaningful, the application must be instrumented to log the relevant values. For instance, each entity/agent/activity is expected to have been given a unique identifier.

The template design phase is also critical. In our design, we decided that one template would describe the invocation of a single function. The same template was reused for all function calls. Alternatives are possible: multiple activities could be described in a single template, alternatively different types of activities could be described in different templates. I will come back to this issue in another blog post in a few weeks.

What is in ProvToolbox 0.7.3?

Today, I released ProvToolbox 0.7.3. The  principal changes in this new version of ProvToolbox are concerned with prov-template, the templating system for provenance. The new release also contains few minor bug fixes and changes.

1. Template System

A reminder: a PROV-template is a PROV document, in which some variables are placeholders for values. A PROV-template is a declarative specification of the provenance intended to be generated by an application.   A set of bindings contains associations between variables and values. The PROV-template  expansion algorithm, when provided with a template and a set of bindings, generates a provenance document, in which all variables have been replaced by values.

PROV-template is a new approach to creating a provenance-enabled application. Templates are designed and embedded in the application’s code, the application logs values (in the form of bindings), and provenance is automatically generated by template expansion.

A tutorial for templates is available on this blog:

In ProvToolbox 0.7.3, we have adopted a more compact and user-friendly representation for sets of bindings. Instead of representing them as PROV, we can now represent them as JSON.  At the same time, we also handle variables in a more uniform manner, allowing variables occurring in mandatory position, to be also used in attribution position. I won’t go into the technical details, but these two changes make the design of templates and the construction of bindings  much simpler!

A further change is that we have implemented a simple “bindings bean” compiler: it takes a template definition and creates a java class, which allows sets of bindings to be created directly from Java, and serialized easily.  The aim of this compiler is to simplify the implementation of applications generating provenance.

The GitHub source code repository contains code for two further tutorials (Tutorial5 and Tutorial6). I will write up the text for these tutorials in the New Year.

2. Qualified Pattern for All PROV Relations

At the recent PROV: Three Years Later Workshop, I made the case for the Qualified Pattern  to be used for all PROV relations. My key motivation for this extension to PROV is my provenance summarisation algorithm, which generates a “summary provenance graph“, in which nodes and edges are annotated with weights indicating how frequently these kinds of nodes and edges  can be found in the original graph. To allow for such annotations to be added to specialization, alternate, and membership relations, they need to support the Qualified Pattern.

At this stage, it is the data model that is modified. Serialization to xml and provn is work in progress, and not supported in prov-json and prov-sql yet. Furthermore, there is no parsing yet. Three new interfaces have been defined in the package org.openprovenance.prov.model.extension.

3. Release Log

For full details of the changes, see the release log at https://github.com/lucmoreau/ProvToolbox/wiki/Releases#073.

4. Conclusion

We keep on using ProvToolbox in various applications to generate provenance with templates and to undertake some analytics using the summarisation algorithm. This new release was critical to support these two use cases of ProvToolbox. Shortly, I will release two further blogs with new tutorials for prov-template.

As always, all relevant links can be found at http://lucmoreau.github.io/ProvToolbox/, including binary installers for linux (rpm and debian) and macosx.

Seasonal greetings!


What is in ProvToolbox 0.7.2?

1. Introduction

Yesterday, I released ProvToolbox 0.7.2, which includes the following novel features.

2. Novel Features

2.1. MacOS X Installer

Continuing our efforts of providing binary installers to facilitate installation of ProvToolbox, this release includes an installer for MacOS X.

Simply follow the link http://openprovenance.org/java/installer/provconvert-0.7.2.dmg, you will then be given access to the installation image.

Installation Disk

Installation Disk

Click on the Installer. Note that you need to allow installation of programs from any sources in your security preferences. Then simply follow the instructions. The installer will install all libraries and executable in /Applications/provconvert (default location, which can be overriden), as well as a symbolic link making the provconvert executable available in your execution path. An Uninstaller is also available as an executable jar file /Applications/provconvert/Uninstaller/uninstaller.jar.

provconvert Installer

provconvert Installer

Et voila! The executable can be invoked directly from the command line.

provconvert -version

which should return provconvert version 0.7.2 (2015-09-15 20:16).

2.2. Templates

As we continue to use templates in our applications, two further requirements have been implemented. It is now possible to expand a template, and strip the result from any variable that has not been instantiated. For this, simply pass the option -allexpand to provconvert, to be used in conjunction with the -bindings option (see Tutorial 4 (part 1) and Tutorial 4 (part 2) on template processing in ProvToolbox). Furthermore, an error code is returned when not all variables have been expanded.

2.3. Interoperability

As we are integrating Provtoolbox, ProvStore and ProvStore in the inter-operability harness developed by the Software Sustainability Institute, we have fixed some minor issues to ensure interoperability between our software stacks.

2.4. provconvert artifact

The artifact toolbox has been renamed into provconvert, since we have plans for other artifacts out of ProvToolbox.

3. Conclusion

For all details about ProvToolbox, see the github.io page http://lucmoreau.github.io/ProvToolbox/.

What is in ProvToolbox 0.7.1?

1. Introduction

Yesterday, I released ProvToolbox 0.7.1. It is a minor release, fixing minor bugs of 0.7.0, and including a useful new feature.

2. Novel Features

2.1. Debian Package

To facilitate installation, a new binary release format is now supported: Debian packaging to support binary release on Ubuntu and other Debian-based Linux distributions. You just need to run the following commands.

wget https://repo1.maven.org/maven2/org/openprovenance/prov/toolbox/0.7.1/toolbox-0.7.1.deb
dpkg --install toolbox-0.7.1.deb

This is in addition to RPM support introduced in 0.6.2:

rpm -U https://repo1.maven.org/maven2/org/openprovenance/prov/toolbox/0.7.1/toolbox-0.7.1-rpm.rpm

2.3 Visualization

Modification of the visualisation component prov-dot allow dge thickness, node size, and tooltips (on SVG) to be controlled. For this, the provenance graph nodes and edges need to be annotated with reserved attributes dot:size and dot:tooltip. The following figure illustrates the kind of graphs that can now be generated.

A summarisation of the provenance challenge workflow. Nodes are to be understood as provenance types. Thickness of edges and size of nodes reflect their frequency in the summarised document.

A summarisation of the provenance challenge workflow. Nodes are to be understood as provenance types. Thickness of edges and size of nodes reflect their frequency in the summarised document.

2.3 Bug fixes

I also fixed some minor bugs in qualified namespaces in the prov-sql package, and updated reserved namespace for provtoolbox.

3. Conclusion

Tell me how you use ProvToolbox and/or provconvert and for for which purpose. Share details of your projects with me, I will add them to https://github.com/lucmoreau/ProvToolbox/wiki/Projects-and-Applications-Using-ProvToolbox.

For all details about ProvToolbox, see the github.io page http://lucmoreau.github.io/ProvToolbox/.

ProvToolbox Tutorial 4: Templates for Provenance (part 1)

1. Introduction

In several of our applications, we felt the need of separating the logging of information from the constructing and storing of provenance. For this, we introduced PROV-Template a templating system for provenance, describing the shape of provenance graphs to be generated, and we specified an algorithm capable of instantiating templates, with specific values.

The purpose of this tutorial is to introduce PROV-Template and how templates can be instantiated using ProvToolbox. This functionality is directly available from the command line using provconvert.

The tutorial is standalone and a zip archive can be downloaded from the following URL: http://search.maven.org/remotecontent?filepath=org/openprovenance/prov/ProvToolbox-Tutorial4/0.7.0/ProvToolbox-Tutorial4-0.7.0-src.zip. The tutorial can also be found on the ProvToolbox project on GitHub.

The tutorial assumes that provconvert has been installed and is available in the execution path. (See http://lucmoreau.github.io/ProvToolbox/ for installation instructions.) The tutorial relies on a Makefile and can simply be run by calling:

make do.all

2. Example of Templates

2.1 A Template for Attribution of a Quote

Building on blog post “A little provenance goes a long way”, imagine that we need to systematically provide attribution to quotes. As this is a repetitive tasks, we should consider the PROV-Templates approach to generate provenance.

A provenance template is itself a PROV document in which some variables act as placeholders for values to be filled at expansion time. More precisely, a template is a bundle of PROV assertions: a bundle is the PROV mechanism by which provenance of provenance can be expressed.

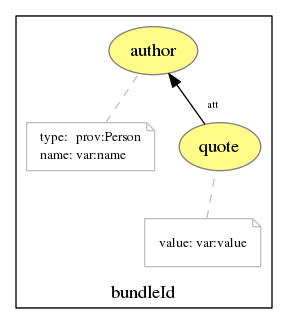
The figure below contains a graphical illustration of a template for Quote Attribution. It contains the following variables:

  • var:author the identifier of the author (stated to be a prov:Person)
  • var:name the author’s name
  • var:quote the identifier of the quote
  • var:value the quote itself
  • vargen:bundleId the identifier of the bundle to be generated

The quote is attributed to the author agent. The variables var:author, var:namer, var:quote, var:value are qualified names in a namespace reserved for PROV-Template variables, and are conventionally prefixed with the prefix var. There is an expectation that values need to be provided for these variables when instantiating a template. On the other hand, the variable vargen:bundleId, with prefix vargen, can have a value generated automatically at instantiation time.

Quote Attribution Template

Quote Attribution Template

Concretely, in the PROV-N notation, the template is expressed as follows.

document

  prefix var <http://openprovenance.org/var#>
  prefix vargen <http://openprovenance.org/vargen#>
  prefix tmpl <http://openprovenance.org/tmpl#>
  prefix foaf <http://xmlns.com/foaf/0.1/>
  
  bundle vargen:bundleId
    entity(var:quote, [prov:value='var:value'])
    entity(var:author, [prov:type='prov:Person', foaf:name='var:name'])
    wasAttributedTo(var:quote,var:author)
  endBundle

endDocument

2.2 Template Instantiation: A Little Provenance Goes a Long Way

Let’s now look into how we can instantiate the templates. Let us consider the following bindings for the 4 variables author, name, quote and value. An association between a variable and a value is referred to as a binding.

var:author http://orcid.org/0000-0002-3494-120X
var:name “Luc Moreau”
var:quote ex:quote1
var:value “A Little Provenance Goes a Long Way”

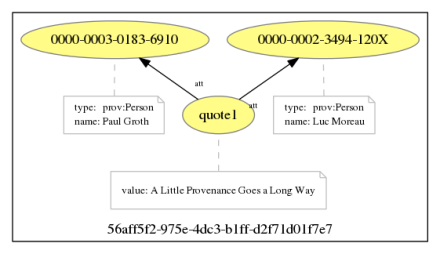
If we instantiate the template with these bindings, we obtain the following instantiated document. We note that vargen:bundleId was instantiated with UUID value.

Template Instantiation for "A Little Provenance Goes a Long Way"

Template Instantiation for “A Little Provenance Goes a Long Way”

Expansion of a template with provconvert is straightforward. The parameter -infile must be used to provide the template. The binding file is specified with the -binding parameter. The resulting instantiated template is specified with -outfile.

	
provconvert -infile template1.provn -bindings binding1.ttl -outfile doc1.provn

The input template and its instantiation can be expressed in any of the formats supported by ProvToolbox. We still have to express the set of bindings. We did not want to introduce a new specific format (though we may do it in the future), so, we just decided to use PROV. In particular, the Turtle notation is fairly elegant in this case. Two family of properties are introduced in the tmpl namespace, namely value_i and 2dvalue_i_j, for binding variables in identifier and value positions, respectively.

@prefix prov: <http://www.w3.org/ns/prov#> .
@prefix xsd: <http://www.w3.org/2001/XMLSchema#> .
@prefix tmpl: <http://openprovenance.org/tmpl#> .
@prefix var: <http://openprovenance.org/var#> .
@prefix ex: <http://example.com/#> .

var:author a prov:Entity;
           tmpl:value_0 <http://orcid.org/0000-0002-3494-120X>.
var:name   a prov:Entity;
           tmpl:2dvalue_0_0 "Luc Moreau".
var:quote  a prov:Entity;
           tmpl:value_0 ex:quote1.
var:value  a prov:Entity;
           tmpl:2dvalue_0_0 "A Little Provenance Goes a Long Way".

Details about the syntax of bindings can be found in https://provenance.ecs.soton.ac.uk/prov-template/.

2.3 Template Instantiation: A Second Author

In some cases, we would like to express that there is a second author to a document. The attribution template does not need to be redefined. We simply need to provide relevant bindings for the second author.

For instance, Paul and Luc are the two authors of that quote. Conceptually, we want to provide the following bindings.

var:author http://orcid.org/0000-0002-3494-120X
http://orcid.org/0000-0003-0183-6910
var:name “Luc Moreau”
“Paul Groth”

We see that each of var:author and var:name is given two values. This results in the following expanded provenance graph.

Instantiation with Two Authors

Template Instantiation with Two Authors

The contents of the bindings file is explicit below. Lines 7-9, var:author is given two values, using the properties tmpl:value_0 and tmpl:value_1. Lines 10-12, var:name is given two values to occur in attribute position, with properties tmpl:2dvalue_0_0 and tmpl:2dvalue_1_0.

@prefix prov: <http://www.w3.org/ns/prov#> .
@prefix xsd: <http://www.w3.org/2001/XMLSchema#> .
@prefix tmpl: <http://openprovenance.org/tmpl#> .
@prefix var: <http://openprovenance.org/var#> .
@prefix ex: <http://example.com/#> .

var:author a prov:Entity;
           tmpl:value_0 <http://orcid.org/0000-0002-3494-120X>;
           tmpl:value_1 <http://orcid.org/0000-0003-0183-6910>.
var:name   a prov:Entity;
           tmpl:2dvalue_0_0 "Luc Moreau";
           tmpl:2dvalue_1_0 "Paul Groth".
var:quote  a prov:Entity; 
           tmpl:value_0 ex:quote1.
var:value  a prov:Entity; 
           tmpl:2dvalue_0_0 "A Little Provenance Goes a Long Way".

Again, we refer the reader to the PROV-Template specification for details of the bindings syntax.

2.4 Template Instantiation: More Attributes

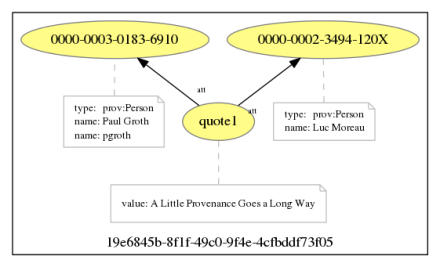
In general, PROV also allows for variable number of attribute values to be provided for a given attribute. For instance, we may want the name and nick name to be provided as two possible values for the var:name variable. This would result in the following expanded graph.

Template Instantiation: Variable Number of Attributes

Template Instantiation with Variable Number of Attributes

Again, the template remains unchanged, but the bindings are as follows. In lines 12-13, we see two possible names for Paul, respectively expressed with tmpl:2dvalue_1_0 and tmpl:2dvalue_1_1. This shows that template expansion can support a variable number of attributes for different statements instantiated from the same template statement.

@prefix prov: <http://www.w3.org/ns/prov#> .
@prefix xsd: <http://www.w3.org/2001/XMLSchema#> .
@prefix tmpl: <http://openprovenance.org/tmpl#> .
@prefix var: <http://openprovenance.org/var#> .
@prefix ex: <http://example.com/#> .

var:author a prov:Entity;
           tmpl:value_0 <http://orcid.org/0000-0002-3494-120X>;
           tmpl:value_1 <http://orcid.org/0000-0003-0183-6910>.
var:name   a prov:Entity;
           tmpl:2dvalue_0_0 "Luc Moreau";
           tmpl:2dvalue_1_0 "Paul Groth";
           tmpl:2dvalue_1_1 "pgroth".
var:quote  a prov:Entity;
           tmpl:value_0 ex:quote1.
var:value  a prov:Entity;
           tmpl:2dvalue_0_0 "A Little Provenance Goes a Long Way".

3. Conclusions

PROV-Template is easy to work with, it just requires provconvert to be installed. By decoupling the generation of provenance from the logging of values, we observed a number of benefits:

  • It allowed us to fine tune the provenance, independently of the application.
  • It permitted us to keep the code to generate the provenance separate from the application itself.
  • It allowed us to adopt a more conceptual approach to provenance, thinking of “provenance schemas” rather than instances.

This is the first part of the tutorial on PROV-Template. In the second part of the tutorial, we will see how PROV-Template can support more sophisticated use cases.

Thanks to co-authors Dong and Danius. Heather has been using it in Smart Society’s SmartShare application.

ProvToolbox Tutorial 3: Merging PROV Documents

1. Introduction

It has become a requirement in several of our applications to merge PROV documents. The purpose of this tutorial is to explain how ProvToolbox allows documents to be merged, ensuring that descriptions are uniquely represented with all their attributes, merging bundles they may contain, and optionally “flattening” them.

This functionality is directly available from the command line using provconvert.

The tutorial is standalone and a zip archive can be downloaded from the following URL: http://search.maven.org/remotecontent?filepath=org/openprovenance/prov/ProvToolbox-Tutorial3/0.7.0/ProvToolbox-Tutorial3-0.7.0-src.zip. The tutorial can also be found on the ProvToolbox project on GitHub.

The tutorial assumes that provconvert has been installed and is available in the execution path.
The tutorial relies on a Makefile and can simply be run by calling:

make do.all

2. Examples of Merges

2.1 Merging two documents without bundles

Our first example consists of two documents. The first document “doc1” consists of the attribution of an entity e1 to an agent ag1. The entity has an attribute attr1.

doc1

doc1

The second document “doc2” describes the derivation of the same entity e1 from another entity e0. The description of the entity e1 contains an attribute attr2.

doc2

doc2

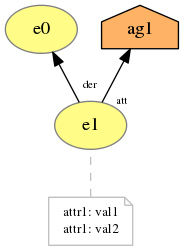
By merging the two documents, we obtain a new document, in which the entity e1 is both attributed to ag1 and derived from e0. The description of e1 contains the attributes attr1 and attr2.

Merged documents doc1 and doc2

Merged documents doc1 and doc2

Merging the two documents is simply performed by calling provconvert with argument -merge as follows.

provconvert -merge doc1-2-listing.txt -outfile target/doc1-2.provn

The -merge option expects a path to a file (or – to indicate standard input) that lists the files that have to be merged. In our case, we have a file doc1-2-listing.txt with the following contents:

file, src/main/resources/doc1.provn, provn
file, src/main/resources/doc2.provn, provn

Each line consists of three elements separated by a comma:

  1. A tag indicating if we are dealing with a file on the file system or a URL
  2. The path to the file or a full http URL
  3. The PROV format expected to be read

For completeness, we show the details of the documents in PROV-N notation. First, “doc1”:

document

 prefix ex <http://example.org/#>

 entity(ex:e1,[ex:attr1="val1"])
 agent(ex:ag1)
 wasAttributedTo(ex:e1, ex:ag1)

endDocument

Then, “doc2”:

document

 prefix ex <http://example.org/#>

 entity(ex:e1,[ex:attr1="val2"])
 entity(ex:e0) 
 wasDerivedFrom(ex:e1, ex:e0)

endDocument

Finally, the merged document:

document
 prefix ex <http://example.org/#>

 entity(ex:e1,[ex:attr1 = "val1" %% xsd:string, ex:attr1 = "val2" %% xsd:string])
 entity(ex:e0)
 agent(ex:ag1)
 wasDerivedFrom(ex:e1, ex:e0)
 wasAttributedTo(ex:e1, ex:ag1)
endDocument

The merge operation follows key constraints of the PROV-CONSTRAINTS specification, such as key-object (constraint 22) and key-properties (constraint 23).
The reader who is familiar with the RDF representation of PROV will note that the merge operation is simply obtained by “concatening” all the RDF files together.

The merge operation becomes interesting in the presence of bundles.

2.2 Merging two documents with distinct bundles

First, we consider two documents with distinct bundles.

We now examine a variant of “doc1”, which contains a bundle bun1. In the illustration, the bundle is represented by a rectangle, which contains a description of e2 generated by a2.

doc1 with bundle bun1

doc1 with bundle bun1

The second document is a variant of “doc2” with another bundle named bun2. It contains a description of e3 generated by a3.

doc2 with bundle bun2

doc2 with bundle bun2

After merging the two documents, we obtain a new document containing both bun1 and bun2.

doc1 with bundle bun1 merged with doc2 with bundle bun2

doc1 with bundle bun1 merged with doc2 with bundle bun2

As we can see, as the two bundles have different names, they are kept distinct in the merged document.

Concretely, the first document with bundle bun1.

document
 prefix ex <http://example.org/#>

 entity(ex:e1,[ex:attr1="val1"])
 agent(ex:ag1)
 wasAttributedTo(ex:e1, ex:ag1)

 bundle ex:bun1
   entity(ex:e2)
   activity(ex:a2,-,-)
   wasGeneratedBy(ex:e2,ex:a2,-)
 endBundle

endDocument

The first document with bundle bun1.

document
 prefix ex <http://example.org/#>

 entity(ex:e1,[ex:attr1="val2"])
 entity(ex:e0) 
 wasDerivedFrom(ex:e1, ex:e0)

 bundle ex:bun2
   entity(ex:e3)
   activity(ex:a3,-,-)
   wasGeneratedBy(ex:e3,ex:a3,-)
 endBundle

endDocument

The merged documents with two bundles is as follows:

document
 prefix ex <http://example.org/#>

 entity(ex:e1,[ex:attr1 = "val1" %% xsd:string, ex:attr1 = "val2" %% xsd:string])
 entity(ex:e0)
 agent(ex:ag1)
 wasDerivedFrom(ex:e1, ex:e0)
 wasAttributedTo(ex:e1, ex:ag1)

 bundle ex:bun2
  entity(ex:e3)
  activity(ex:a3,-,-)
  wasGeneratedBy(ex:e3,ex:a3,-)
 endBundle

 bundle ex:bun1
  entity(ex:e2)
  activity(ex:a2,-,-)
  wasGeneratedBy(ex:e2,ex:a2,-)
 endBundle
endDocument

2.3 Merging and flattening two documents with distinct bundles

We can optionally use the -flatten option to “remove” bundles, and “pour” their content in the surrounding document.

provconvert -merge doc1b1-2b2-listing.txt -flatten -outfile target/doc1b1-2b2-flatten.provn

The resulting document no longer contains bundles.

Merge and flatten of doc1 with bundle bun1 and doc2 with bundle bun2

Merge and flatten of doc1 with bundle bun1 and doc2 with bundle bun2

document
 prefix ex <http://example.org/#>

 entity(ex:e1,[ex:attr1 = "val1" %% xsd:string, ex:attr1 = "val2" %% xsd:string])
 entity(ex:e0)
 agent(ex:ag1)
 wasDerivedFrom(ex:e1, ex:e0)
 wasAttributedTo(ex:e1, ex:ag1)
 entity(ex:e3)
 activity(ex:a3,-,-)
 wasGeneratedBy(ex:e3,ex:a3,-)
 entity(ex:e2)
 activity(ex:a2,-,-)
 wasGeneratedBy(ex:e2,ex:a2,-)
endDocument

2.4 Merging two documents with the same bundle

Now, let us consider a variant of “doc2” with a bundle bun1, the same identifier as the bundle we had in the “doc1” variant. In the figure, we see that bundle bun1 contains a description of a2 generating e3.

A variant of doc2 with bundle named bun1

A variant of doc2 with bundle named bun1

If we now merge doc1 with bundle bun1 and doc2 with bundle bun1, the merge procedure merges the descriptions contained in the two instances of bundle bun1. We obtain:

doc1 with bundle bun1 merged with doc2 with bundle bun2

doc1 with bundle bun1 merged with doc2 with bundle bun2

2.5 Merging and flattening two documents with the same bundle

If in addition, we specify the -flatten option, merging and flattening operations result in the following document.

doc1 with bundle bun1 merged with doc2 with bundle bun1, after flattening

doc1 with bundle bun1 merged with doc2 with bundle bun1, after flattening

3. Conclusion

As our applications generate provenance incrementally, bundles by bundles, the ability to merge documents and collapse bundles has become critical. This functionality is implemented by ProvToolbox in the method IndexedDocument.merge(). This tutorial has shown that it is also directly available from the command line, using the provconvert utility.

What form of processing do you regularly perform on your provenance graphs? Which functionality would you like to see added to ProvToolbox? Tell us, and for any other issue related to ProvToolbox, on the Github issue tracker.

4. Appendix. Log Change

  • Original version submitted on 2015/07/27

ProvToolbox Tutorial 2: Reading, Converting and Saving PROV Documents

1. Introduction

Building on the first ProvToolbox tutorial, the aim of this second tutorial is to show how to read a PROV document using ProvToolbox and export it to some format.

We assume that installation instructions as described in the first Tutorial have been followed. Details about the Maven configuration can also be found there.

2. Download and Execution

The tutorial is standalone and a zip archive can be downloaded from the following URL: http://search.maven.org/remotecontent?filepath=org/openprovenance/prov/ProvToolbox-Tutorial2/0.7.0/ProvToolbox-Tutorial2-0.7.0-src.zip. The tutorial can also be found on the ProvToolbox project on GitHub.

After unziping the archive, we can execute the tutorial, by calling:

mvn clean install

Beside the verbose logging by the Maven build process, the tutorial itself displays the following text, including some PROV expressed according to PROV-XML.

*************************
* Converting document  
*************************

<?xml version="1.0" encoding="UTF-8" standalone="yes"?>
<prov:document xmlns:prov="http://www.w3.org/ns/prov#" xmlns:xsi="http://www.w3.org/2001/XMLSchema-instance" xmlns:xsd="http://www.w3.org/2001/XMLSchema" xmlns:foaf="http://xmlns.com/foaf/0.1/" xmlns:provbook="http://www.provbook.org" xmlns:jim="http://www.cs.rpi.edu/~hendler/">
    <prov:entity prov:id="provbook:a-little-provenance-goes-a-long-way">
        <prov:value xsi:type="xsd:string">A little provenance goes a long way</prov:value>
    </prov:entity>
    <prov:agent prov:id="provbook:Paul">
        <foaf:name xsi:type="xsd:string">Paul Groth</foaf:name>
    </prov:agent>
    <prov:agent prov:id="provbook:Luc">
        <foaf:name xsi:type="xsd:string">Luc Moreau</foaf:name>
    </prov:agent>
    <prov:wasAttributedTo>
        <prov:entity prov:ref="provbook:a-little-provenance-goes-a-long-way"/>
        <prov:agent prov:ref="provbook:Paul"/>
    </prov:wasAttributedTo>
    <prov:wasAttributedTo>
        <prov:entity prov:ref="provbook:a-little-provenance-goes-a-long-way"/>
        <prov:agent prov:ref="provbook:Luc"/>
    </prov:wasAttributedTo>
    <prov:entity prov:id="jim:LittleSemanticsWeb.html"/>
    <prov:wasDerivedFrom>
        <prov:generatedEntity prov:ref="provbook:a-little-provenance-goes-a-long-way"/>
        <prov:usedEntity prov:ref="jim:LittleSemanticsWeb.html"/>
    </prov:wasDerivedFrom>
</prov:document>

*************************

3. Reading and writing PROV documents in Java

The following Java snippet is extracted from the file src/main/java/org/openprovenance/prov/tutorial/tutorial2/ReadWrite.java. In line 3, it shows how a document can be read, given its path filein on the file system. In line 4, we see how a PROV Document can be saved into a file fileout. The writeDocument procedure determines the PROV format that is required by looking at the extension. If a non-standard extension is used, then the format can be specified explicitly, as in line 5, by one of the values of the enumerated type ProvFormat.

    public void doConversions(String filein, String fileout) {
        InteropFramework intF=new InteropFramework();
        Document document=intF.readDocumentFromFile(filein);
        intF.writeDocument(fileout, document);     
        intF.writeDocument(System.out, ProvFormat.XML, document);
    }

   public static void main(String [] args) {
        if (args.length!=2) throw new UnsupportedOperationException("main to be called with two filenames");
        String filein=args[0];
        String fileout=args[1];
        
        ReadWrite tutorial=new ReadWrite(InteropFramework.newXMLProvFactory());
        tutorial.openingBanner();
        tutorial.doConversions(filein, fileout);
        tutorial.closingBanner();
    }

For completion, line 13 shows how the tutorial class is initialized and line 15 takes care of invoking the conversion functionality.

The tutorial is called from the command line, passing src/main/resources/a-little.provn as the input file, and target/a-little.svg as the output file.  Therefore, the a-little.provn file is converted to SVG (by line 4) and to XML on standard output (by line 5).

The following table lists the formats that are supported by ProvToolbox.

gv text/vnd.graphviz output
dot text/vnd.graphviz output
prov-asn text/provenance-notation input
prov-asn text/provenance-notation output
pn text/provenance-notation input
pn text/provenance-notation output
asn text/provenance-notation input
asn text/provenance-notation output
provn text/provenance-notation input
provn text/provenance-notation output
rdf application/rdf+xml input
rdf application/rdf+xml output
json application/json input
json application/json output
ttl text/turtle input
ttl text/turtle output
trig application/trig input
trig application/trig output
jpeg image/jpeg output
jpg image/jpeg output
provx application/provenance+xml input
provx application/provenance+xml output
xml application/provenance+xml input
xml application/provenance+xml output
png image/png output
pdf application/pdf output
svg image/svg+xml output

4. Conclusion

For further documentation on the classes and methods used, Javadoc for ProvToolbox can be found from http://openprovenance.org/java/site/latest/apidocs/.  The Javadoc documentation also refers to PROV specifications where appropriate.

Suggestions for tutorials and also for ways of improving the programming experience offered by ProvToolbox are always welcome. Please raise issues on GitHub issue tracker.

5. Appendix. Log Change

  1. Original version submitted on 2015/06/30
  2. Updated to 0.7.0 on 2015/07/27

What is in ProvToolbox 0.6.1?

I have just released ProvToolbox version 0.6.1, shortly after 0.6.0. There is one notable novelty: ProvToolbox is now promoted to Maven central. This means that no special configuration for artefact repositories is required; instead, the default maven repository is now used. Furthermore, the project complies with Sonatype rules for publication: signed artefacts, web site, documentation, etc. The tutorial was adapted to reflect this new configuration.

ProvToolbox Tutorial 1: Creating and Saving a PROV Document

1. Introduction

The aim of this tutorial is to show how to create a simple PROV Document in Java using ProvToolbox, and export it to some format.  The post also explains how to configure Maven to use the required ProvToolbox artifacts.

The tutorial is based on “A Little Provenance Goes a Long Way“, a quote that Paul and I asserted in our book  “An introduction to PROV” (see www.provbook.org).

2. Download and Execution

The tutorial is standalone and a zip archive can be downloaded from the following URL: http://search.maven.org/remotecontent?filepath=org/openprovenance/prov/ProvToolbox-Tutorial1/0.7.0/ProvToolbox-Tutorial1-0.7.0-src.zip.The tutorial can also be found on the ProvToolbox project on GitHub.

After unziping the archive, we obtain the following directory structure:

tutorial1

The directory contains a README file, a license file, and a  Maven pom.xml configuration file, and a source directory containing a single Java file.

To execute the tutorial, you need to have two pieces of software installed:

  1. the software project management tool Apache Maven  (see http://maven.apache.org/download.html),  and
  2. the graph visualization software GraphViz (see http://www.graphviz.org/).

You are then ready to execute the tutorial by calling

mvn clean install

Beside the verbose logging by the Maven build process, the tutorial itself displays the following text, including some PROV expressed according to the Provenance Notation.

*************************
* Converting document  
*************************
document
prefix xsd <http://www.w3.org/2001/XMLSchema>
prefix provbook <http://www.provbook.org>
prefix jim <http://www.cs.rpi.edu/~hendler/>
entity(provbook:a-little-provenance-goes-a-long-way,[prov:value = "A little provenance goes a long way" %% xsd:string])
agent(provbook:Paul,[prov:label = "Paul Groth"])
agent(provbook:Luc,[prov:label = "Luc Moreau"])
wasAttributedTo(provbook:a-little-provenance-goes-a-long-way, provbook:Paul)
wasAttributedTo(provbook:a-little-provenance-goes-a-long-way, provbook:Luc)
entity(jim:LittleSemanticsWeb.html)
wasDerivedFrom(provbook:a-little-provenance-goes-a-long-way, jim:LittleSemanticsWeb.html)
endDocument
*************************

Furthermore, a file target/little.svg appears in the target/ directory. It displays as follows.
little

3. Java Source Code

We now examine the Java class Little. The main method creates an instance of the Little class, constructs a PROV document, and writes it to a file, and also displays it on the System.out stream, in the Provenance notation (here "target/little.svg" was passed as argument when invoking the main method).

    public void doConversions(Document document, String file) {
        InteropFramework intF=new InteropFramework();
        intF.writeDocument(file, document);     
        intF.writeDocument(System.out, ProvFormat.PROVN, document);
    }

    public static void main(String [] args) {
        if (args.length!=1) throw new UnsupportedOperationException("main to be called with filename");
        String file=args[0];
        
        Little little=new Little(InteropFramework.newXMLProvFactory());
        little.openingBanner();
        Document document = little.makeDocument();
        little.doConversions(document,file);
        little.closingBanner();
    }

The InteropFramework class deals with conversion of Java representations to PROV serializations and vice-versa. It uses the writeDocument method to save a Document to a file or to an Outputstream.

The code snippet below displays the method  makeDocument which constructs a Document. It proceeds by creating two entities quote and original, and two agents paul and luc. It then creates three associations (two attributions from quote to the agents) and one derivation from the quote to the original.  A new Document is created, and all the assertions are added. The Document namespace is also set appropriately.

    public Document makeDocument() {     
        Entity quote = pFactory.newEntity(qn("a-little-provenance-goes-a-long-way"));
        quote.setValue(pFactory.newValue("A little provenance goes a long way",
                                         pFactory.getName().XSD_STRING));

        Entity original = pFactory.newEntity(ns.qualifiedName(JIM_PREFIX,"LittleSemanticsWeb.html",pFactory));

        Agent paul = pFactory.newAgent(qn("Paul"), "Paul Groth");
        Agent luc = pFactory.newAgent(qn("Luc"), "Luc Moreau");

        WasAttributedTo attr1 = pFactory.newWasAttributedTo(null,
                                                            quote.getId(),
                                                            paul.getId());
        WasAttributedTo attr2 = pFactory.newWasAttributedTo(null,
                                                            quote.getId(),
                                                            luc.getId());
        WasDerivedFrom wdf = pFactory.newWasDerivedFrom(quote.getId(),
                                                        original.getId());

        Document document = pFactory.newDocument();
        document.getStatementOrBundle()
                .addAll(Arrays.asList(new StatementOrBundle[] { quote, 
                                                                paul,
                                                                luc, 
                                                                attr1,
                                                                attr2, 
                                                                original,
                                                                wdf }));
        document.setNamespace(ns);
        return document;
    }
    public QualifiedName qn(String n) {
        return ns.qualifiedName(PROVBOOK_PREFIX, n, pFactory);
    }

As one can see from the code, the ProvFactory is used to create all statements. The constructor receives a ProvFactory from the main method. The constructor also creates a namespace object ns to manage all namespace/prefix declarations.

    public Little(ProvFactory pFactory) {
        this.pFactory = pFactory;
        ns=new Namespace();
        ns.addKnownNamespaces();
        ns.register(PROVBOOK_PREFIX, PROVBOOK_NS);
        ns.register(JIM_PREFIX, JIM_NS);
    }

4. Maven Configuration

The Maven configuration file is straightforward to define. First, one needs to specify the artifacts this code depends on. There are two of them. The prov-model artifact provides the classes necessary to manipulate the PROV Data Model in Java, irrespectively of the serialization chosen for it. The prov-interop artifact provides the classes necessary to convert the PROV Data Model in Java to any PROV-compatible serialization and back.

  <dependencies>
    <dependency>
      <groupId>org.openprovenance.prov</groupId>
      <artifactId>prov-model</artifactId>
      <version>0.7.0</version>
    </dependency>
    <dependency>
      <groupId>org.openprovenance.prov</groupId>
      <artifactId>prov-interop</artifactId>
      <version>0.7.0</version>
    </dependency>
  </dependencies>

Since version 0.6.1, ProvToolbox is deployed on Maven central. Hence, it is not required to specify any repository for artifacts.

For completeness, we show how the tutorial is started by Maven during the test phase. The main method of class Little is invoked by the exec-maven-plugin passing an explicit argument target/little.svg.

<plugin>
	<groupId>org.codehaus.mojo</groupId>
	<artifactId>exec-maven-plugin</artifactId>
	<version>1.3.2</version>
	<executions>
	  <execution>
	    <phase>test</phase>
	    <goals>
	      <goal>java</goal>
	    </goals>
	    <configuration>
	      <mainClass>org.openprovenance.prov.tutorial.tutorial1.Little</mainClass>
	      <arguments>
		<argument>target/little.svg</argument>
	      </arguments>
	    </configuration>
	  </execution>
	</executions>
</plugin>

5. Conclusion

For further documentation on the classes and methods used, Javadoc for ProvToolbox can be found from http://openprovenance.org/java/site/latest/apidocs/.  The Javadoc documentation also refers to PROV specifications where appropriate.

This is the first tutorial for ProvToolbox. Others will follow. We also welcome suggestions for tutorial topics, and also for ways of improving the programming experience offered by ProvToolbox. Post comments on this site or use GitHub issues.


6. Appendix. Log Change

  1. Original version submitted on 2014/08/01
  2. Updated with maven central configuration on 2014/08/08
  3. Updated to 0.6.2 on 2015/07/01
  4. Updated to 0.7.0 on 2015/07/27


What’s in ProvToolbox 0.6.0?

Back in December, I was releasing ProvToolbox 0.5.0. On August 1st 2014, I released version 0.6.0. This post outlines the key changes of this version. These were driven by requirements from ProvTranslator, ProvValidator, Picaso, and a new provenance template management system (I will blog about Picaso and the template management system in the near future.

1. Novel features

1.1 Random Generator

ProvToolbox now includes Jamal Hussein’s PROV graph generator. For instance, the provconvert command

provconvert -generator 30:3:entity:1234 -outfile foo.jp

generates the following provenance graph, where 30 is the number of nodes generated, 3 is the maximum connectivity, entity is the type of the first node, 1234 is an optional seed.

random

1.2 Templating System

prov-template is a templating system developed by Danius Michaelides, Trung Dong Huynh, and myself. Its specification is available at https://provenance.ecs.soton.ac.uk/prov-template/. ProvToolbox now contains a reference implementation of this specification. See the section Implementation for a description of how to invoke the templating system from the command line.

1.3 Tutorial

A tutorial for ProvToolbox is long overdue. ProvToolbox 0.6.0 now includes a small tutorial, explaining how to set up a maven environment, write some Java code to create a provenance document and serialize it to your favourite format. More similar short tutorials are also in the pipeline. Watch this space!

2. Improvements

2.1 Better inter-operability

The key motto of ProvToolbox is to construct a Java representation of the Provenance Data Model, manipulate it, and save it.  Two key “generic” methods, readDocument and witeDocument, were introduced to perform read and write operations.

The method readDocument(InputStream, ProvFromat) reads a Document from an inputstream, using the parser specified by the format argument. Likewise, writeDocument(OutputStream, ProvFormat, Document) writes a document to an output stream according to the specified format.

Furthermore, ProvToolbox provides support for content negotiation over PROV-related media types. This feature is heavily exploited by the services ProvTranslator and ProvValidator.

2.2 prov-sql

prov-sql is now being used in a template management system we are developing. It works in the sense that it has been tested in the context of that system, but it is in no way optimized. Indeed, there is plenty of room for improvement! It is now time for others to have a look at the mapping, experiment with it, and improve it. prov-sql uses a JPA ORM to map Java Beans to a SQL database. The automatically-generated documentation of the mapping between Java classes and SQL tables is available from prov-sql orm mapping page.

2.3 Bug fixes and documentation

A series of bugs have been fixed (see GitHub Issues). Thanks to those who submitted bug reports.

Dependencies of ProvToolbox have been revised: there is a general upgrading to more recent artifacts, and superflous dependencies were removed.

2.4 GitHub IO page

And last, but not, least, ProvToolbox now has its own GitHub IO page at http://lucmoreau.github.io/ProvToolbox/

3. Conclusion

Overall, it is a release that consolidates ProvToolbox, supporting better inter-operability across PROV representations, and supporting functionality in our various services.